Related Articles


Discord is a popular platform for gamers, communities, and friends to connect through voice, video, and text. Joining servers on Discord allows you to participate in these communities and enjoy all the platform has to offer. Here’s a step-by-step guide to help you join servers on Discord effortlessly.
What is a Discord Server?
A Discord server is like a chat room or forum where people with similar interests gather. Servers can be private, requiring an invitation, or public, where anyone can join. They contain various channels for different topics, including text, voice, and even video channels.
Steps to Join a Discord Server
1. Getting an Invite Link
The most common way to join a Discord server is through an invite link. Here’s how you can get one:
- From Friends: Ask your friends to send you an invite link if they are already members of a server you want to join.
- From Websites and Forums: Many websites and forums share invite links to their Discord servers. Look for these links in community sections or dedicated pages.
- Social Media: Some servers promote their invite links on social media platforms like Twitter, Reddit, or Facebook.
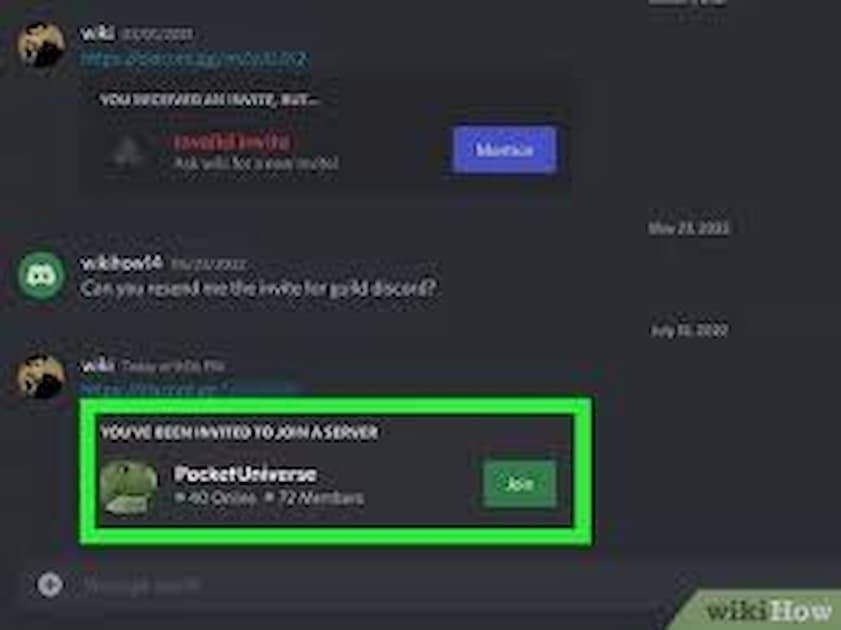
2. Using the Invite Link
Once you have an invite link, follow these steps:
- Step 1: Click on the invite link. It will redirect you to a new page.
- Step 2: If you have the Discord app installed, it will open automatically. If not, you can join through the web version.
- Step 3: Log in to your Discord account if prompted.
- Step 4: Click on the “Join” button to become a member of the server.
3. Joining Public Servers
Discord has a directory of public servers that anyone can join. Here’s how to find and join them:
- Step 1: Open Discord and click on the “Explore Public Servers” button, usually located on the left sidebar.
- Step 2: Browse through the categories or use the search bar to find servers related to your interests.
- Step 3: Click on a server to view more details.
- Step 4: If you want to join, click the “Join” button.
Creating a Discord Account
If you don’t have a Discord account yet, you’ll need to create one before joining any servers. Here’s how:
- Step 1: Go to Discord’s website or download the app from your device’s app store.
- Step 2: Click on the “Register” button.
- Step 3: Fill in your email, create a username, and set a password.
- Step 4: Verify your email address by clicking on the verification link sent to your inbox.
- Step 5: Log in to your new account and start joining servers.
Tips for Finding the Right Server
1. Know Your Interests
Identify your interests and look for servers that match. Whether it’s gaming, tech, music, or movies, there’s likely a server for you.
2. Check Server Activity
Before joining, check the server’s activity level. Active servers with regular posts and interactions are generally more engaging.
3. Read Server Rules
Each server has its own set of rules. Make sure to read and understand them to avoid any issues after joining.
4. Use Server Directories
There are several websites dedicated to listing Discord servers. Websites like Disboard, Discord.me, and DiscordServers.com can help you find servers easily.
Staying Safe on Discord
While Discord is a great platform for connecting with others, it’s important to stay safe:
- Protect Your Privacy: Don’t share personal information with strangers.
- Report Inappropriate Behavior: Use Discord’s reporting features if you encounter harassment or inappropriate content.
- Secure Your Account: Enable two-factor authentication to add an extra layer of security to your account.
Conclusion
Joining servers on Discord is a simple process that opens the door to countless communities and interactions. By following the steps outlined above, you can easily find and join servers that match your interests. Remember to stay safe and enjoy your time on Discord!
