Crocheting squares is a popular technique for creating blankets, pillows, and other cozy projects. Joining these squares together can be a bit challenging, but with the right methods, you can achieve a beautiful and seamless finish. This guide will walk you through various techniques on how to join crochet squares, ensuring your project looks professional and polished.
Why Join Crochet Squares?
Joining crochet squares allows you to:
- Create Larger Projects: Combine multiple squares to make blankets, throws, and other large items.
- Customize Designs: Mix and match different colors and patterns for a unique look.
- Enhance Durability: Properly joined squares add strength and stability to your project.
Materials and Tools Needed
Before you begin, gather the necessary materials and tools:
- Crochet Squares: Your completed crochet squares.
- Yarn: Matching or contrasting yarn for joining the squares.
- Crochet Hook: Use the same size hook you used for the squares.
- Tapestry Needle: For weaving in ends.
- Scissors: For cutting yarn.
Step-by-Step Guide to Joining Crochet Squares
1. Prepare Your Squares
Timeframe: 10-15 minutes
Ensure all your crochet squares are finished, blocked, and of the same size. This makes the joining process easier and results in a more uniform project.
2. Choose a Joining Method
Timeframe: Varies
There are several methods to join crochet squares, including whip stitch, slip stitch, single crochet join, and join-as-you-go. Choose the method that best suits your project and skill level.
3. Whip Stitch Join
Timeframe: 20-30 minutes per row
The whip stitch is a simple and effective method for joining squares.
- Align the Squares: Place two squares with the right sides facing each other.
- Thread the Needle: Use a tapestry needle and matching yarn.
- Whip Stitch: Insert the needle through the edge stitches of both squares and pull through. Continue stitching along the edge, ensuring the stitches are even and tight.
- Secure the End: When you reach the end, weave in the yarn ends to secure the join.
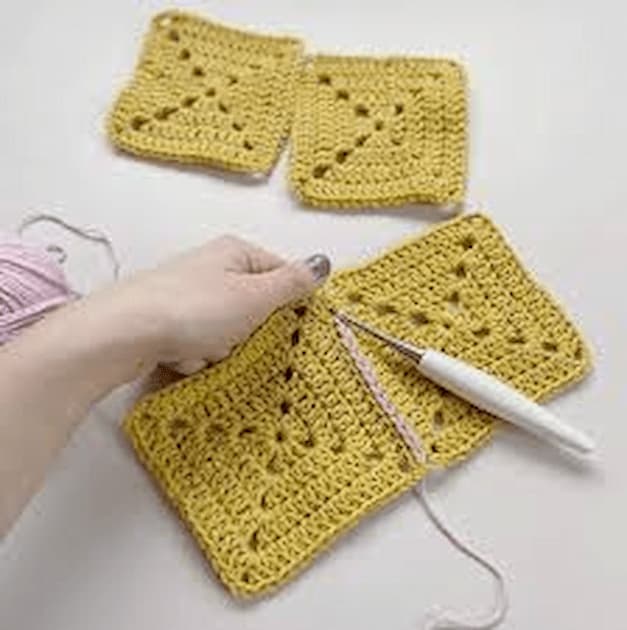
4. Slip Stitch Join
Timeframe: 20-30 minutes per row
The slip stitch join creates a nearly invisible seam.
- Align the Squares: Place two squares with the right sides facing each other.
- Slip Stitch: Insert your crochet hook through the corner stitches of both squares, yarn over, and pull through all loops. Continue slip stitching through each stitch along the edge.
- Secure the End: Cut the yarn and weave in the ends.
5. Single Crochet Join
Timeframe: 30-40 minutes per row
The single crochet join adds a decorative ridge to your project.
- Align the Squares: Place two squares with the wrong sides facing each other.
- Single Crochet: Insert your hook through the corner stitches of both squares, yarn over, and pull through. Yarn over again and pull through both loops on the hook. Continue single crocheting through each stitch along the edge.
- Secure the End: Cut the yarn and weave in the ends.
6. Join-As-You-Go (JAYG)
Timeframe: 40-50 minutes per row
Join-as-you-go is a method where you join squares while crocheting the last round.
- Start a New Square: Crochet the final round of your square.
- Join Corners: When you reach a corner, slip stitch into the corresponding corner of the adjacent square.
- Join Sides: Continue slip stitching into the adjacent square along the sides as you complete the final round.
- Secure the End: Finish the final round, cut the yarn, and weave in the ends.
Tips for a Successful Join
- Consistent Tension: Maintain consistent tension while joining to ensure a uniform appearance.
- Match Yarn Weight: Use the same weight yarn for joining as you used for the squares.
- Color Coordination: Choose a yarn color that complements your squares, either matching or contrasting, depending on the desired effect.
- Block Squares: Block your squares before joining to ensure they are the same size and shape.
Common Mistakes to Avoid
Uneven Edges
Solution: Make sure all squares are the same size and blocked properly before joining.
Loose Joins
Solution: Maintain even tension and use a secure knot at the start and end of your join.
Visible Seams
Solution: Choose a joining method that complements your project, such as the slip stitch join for a nearly invisible seam.
Conclusion
Joining crochet squares is a fundamental skill that can elevate your crochet projects to the next level. By following the methods outlined in this guide, you can achieve a seamless and professional finish that enhances the overall look and durability of your work. Whether you choose the whip stitch, slip stitch, single crochet join, or join-as-you-go method, practice and patience will help you master the technique. Happy crocheting!