Related Articles


For knitters, the technique of joining raglan seams is both a practical skill and a creative endeavor. Raglan seams create a smooth, seamless transition between the body and sleeves of a garment, resulting in a polished and professional finish. If you’re eager to master this essential knitting technique, you’ve come to the right place. In this comprehensive guide, we’ll walk you through the steps of joining raglan seams with ease, allowing you to create beautiful, seamless garments with confidence.
1. Understanding Raglan Seams
Before diving into the process of joining raglan seams, it’s essential to understand what they are and how they work. Raglan seams are diagonal seams that extend from the underarm to the neckline of a garment, creating a seamless transition between the body and sleeves. They are commonly used in sweaters, cardigans, and other garments to provide a flattering fit and a sleek, modern look.
2. Prepare Your Knitting
To begin joining raglan seams, ensure that your knitting is prepared and ready to assemble. This may involve blocking your pieces to ensure they are the correct size and shape, as well as arranging them in the proper orientation for seaming. Take the time to review your pattern instructions and familiarize yourself with the construction of the garment before proceeding.
3. Align Your Pieces
Once your knitting is prepared, it’s time to align your pieces and prepare them for seaming. Lay out the body and sleeves of your garment on a flat surface, ensuring that they are positioned correctly and that the edges to be seamed are aligned evenly. Use stitch markers or pins to hold the pieces in place and prevent them from shifting during the seaming process.
4. Choose Your Seaming Method
There are several different methods for joining raglan seams, each with its own advantages and techniques. Common methods include mattress stitch, backstitch, and whip stitch. Choose the method that best suits your knitting style and the desired finish of your garment. Experiment with different techniques to find the one that works best for you.
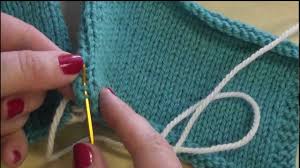
5. Seam Your Garment
With your pieces aligned and your seaming method chosen, it’s time to begin joining the raglan seams. Work methodically and carefully, ensuring that your stitches are even and consistent. Take your time and pay attention to detail, as neat and tidy seams will contribute to the overall professional finish of your garment.
6. Finishing Touches
Once you’ve completed seaming the raglan seams, it’s time for the finishing touches. Weave in any loose ends, block your garment if necessary to shape and smooth the seams, and admire your handiwork. Take pride in the fact that you’ve mastered a fundamental knitting technique that will elevate your projects to the next level.
7. Practice and Patience
As with any new knitting technique, joining raglan seams requires practice and patience. Don’t be discouraged if your first attempts aren’t perfect—keep practicing, and soon you’ll become more confident and proficient. Remember that knitting is as much about the process as it is about the finished product, so enjoy the journey and celebrate your progress along the way.
Conclusion: Seamlessly Stitching It All Together
In conclusion, mastering the art of joining raglan seams is an essential skill for knitters of all levels. By following the steps outlined in this guide and practicing with patience and perseverance, you can create beautiful, seamless garments that showcase your knitting talents. So grab your needles and yarn, and start stitching your way to seamless perfection today!
