Command Strips are a popular choice for hanging items without damaging walls, but removing them can sometimes be tricky. Here’s a step-by-step guide to help you remove Command Strips quickly and easily, without leaving any residue or damage behind.
Tools You Might Need:
- Hairdryer (optional)
- Dental floss
- Rubbing alcohol or adhesive remover (e.g., Goo Gone)
- Clean cloth
- Patience
Steps to Remove Command Strips:
- Turn Off the Heat: If you’re using a hairdryer, turn it off and let it cool down. You’ll use it to soften the adhesive, but it should be cool when you start the removal process.
- Remove the Item: Carefully lift the item that’s attached to the Command Strip. Pull it straight up and away from the wall to avoid damaging the strip.
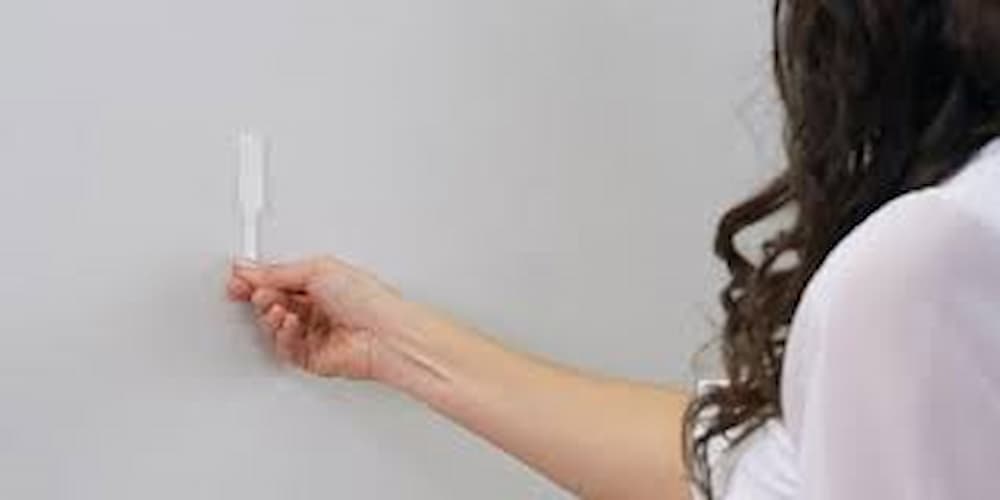
- Pull the Tab: Locate the clear tab at the base of the Command Strip. Grasp the tab firmly and slowly pull it down along the wall, not outwards. Pulling it straight down helps to release the adhesive cleanly.
- Stretch the Tab: Continue pulling the tab until the Command Strip comes off the wall. The tab may stretch up to a foot or more. Keep pulling until the adhesive releases from the wall.
- Use Dental Floss (if needed): If the tab breaks off before the Command Strip is removed, use dental floss to shimmy between the wall and the sticky part. Gently slide the floss back and forth to loosen the adhesive.
- Clean Residual Adhesive: If there’s any adhesive residue left on the wall, use rubbing alcohol or an adhesive remover like Goo Gone. Apply a small amount to a clean cloth and gently rub the area until the residue is gone.
- Wipe the Wall: Once the adhesive is removed, wipe the wall with a clean, damp cloth to remove any remaining cleaner.