Related Articles


Crocheting granny squares is a fun and versatile activity, but connecting them seamlessly can be a challenge. Learning how to join granny squares with a flat seam can make your finished projects look polished and professional. In this guide, we’ll walk you through the steps to achieve a flat seam, ensuring your crochet pieces are as beautiful as they are sturdy.
Why Choose a Flat Seam?
A flat seam is an excellent choice for joining granny squares because it lays smoothly, preventing any bulkiness that can occur with other joining methods. This technique is perfect for projects where comfort and aesthetics are important, such as blankets, garments, and home decor items.
Materials Needed
Before we dive into the step-by-step instructions, let’s gather the necessary materials:
- Granny squares: Ensure all squares are blocked and of the same size.
- Yarn: Use the same yarn as your granny squares for a consistent look.
- Crochet hook: Choose a hook size that matches your yarn.
- Scissors: For trimming excess yarn.
- Tapestry needle: For weaving in ends.
Preparing Your Granny Squares
Preparation is key to achieving a neat and flat seam. Here’s how to prepare your granny squares:
1. Blocking Your Squares
Blocking is the process of wetting and shaping your crochet pieces to ensure they are uniform in size and shape. This step is crucial for a neat join.
- Wet each square: Lightly spray each square with water or use a damp cloth.
- Shape and pin: Lay the squares flat on a blocking mat, shaping them to the correct size, and pin them in place.
- Dry: Allow the squares to dry completely before removing the pins.
2. Arranging the Squares
Lay out your granny squares in the desired pattern. This helps you visualize the final project and ensures you join them in the correct order.
Step-by-Step Guide to Joining with a Flat Seam
Now that your squares are prepared, let’s get started on joining them with a flat seam.
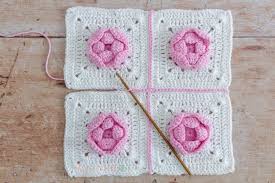
1. Align the Squares
Place two granny squares with the right sides facing up, aligning the edges you want to join. Make sure the corners and stitches match up.
2. Start the Seam
- Insert your hook: Insert your crochet hook through the corner stitch of both squares.
- Join with a slip stitch: Pull a loop of your joining yarn through both squares and then through the loop on your hook.
3. Work the Seam
- Single crochet through both loops: Insert your hook through the front loop of the first square and the back loop of the second square. Yarn over and pull through both loops, then complete a single crochet.
- Repeat across: Continue this process across the entire edge, ensuring you are working through the front loop of the first square and the back loop of the second square.
4. Finish the Seam
When you reach the end of the edge, fasten off your yarn and weave in the ends using a tapestry needle.
Tips for a Perfect Flat Seam
- Consistent tension: Maintain consistent tension in your stitches to prevent puckering or stretching.
- Check alignment: Frequently check the alignment of your squares to ensure they stay even.
- Practice makes perfect: Practice the flat seam technique on scrap squares before working on your main project.
Benefits of a Flat Seam
- Smooth finish: The flat seam lies smoothly, creating a clean, professional look.
- Comfortable: Ideal for items that will be worn or used close to the skin, as there are no bulky seams.
- Durable: Provides a strong join that can withstand wear and tear.
Common Mistakes and How to Avoid Them
1. Uneven Squares
Ensure all your squares are blocked to the same size to avoid uneven joins.
2. Loose or Tight Seams
Maintain even tension throughout your stitching to prevent loose or tight seams.
3. Misaligned Stitches
Check alignment frequently to ensure your stitches match up correctly.